


Summary
When you restore only a couple of files from an archive restore, you experience very long restore times. When the tape device supports Forward Skip Record (FSR), you can workaround the problem as described in the Resolution.
Symptoms
In the nibbler.log from the device server, notice that the tape volser is mounted and being scanned:
<DATE> 2013:5376:INFO:Tape position: block:[0] partition:[0]

<DATE> 10:26:55 2013:5376:INFO:tapectl:[rwnd:0]

<DATE> 10:26:56 2013:5376:INFO:[\\.\Tape1]: Begin reading from media labeled:[VOL1YYYYYY ]:

<DATE> 10:26:56 2013:5376:INFO:tapectl:[fsf:1]

<DATE> 10:26:56 2013:5376:INFO:Socket [692] listening on port [52021].:

<DATE> 10:26:56 2013:5376:INFO:MOVER:892:Socket connected to [chsrv1fr.chbrudfr.int:172.16.6.3].

<DATE> 10:27:03 2013:5376:INFO:[\\.\Tape1]: Processed [268435696] bytes. Throughput [14,913,094] B/s. Continuing...:

<DATE> 10:27:09 2013:5376:INFO:[\\.\Tape1]: Processed [536903920] bytes. Throughput [44,744,704] B/s. Continuing...:

<DATE> 10:27:16 2013:5376:INFO:[\\.\Tape1]: Processed [805372144] bytes. Throughput [38,352,603] B/s. Continuing...:

<DATE> 10:27:22 2013:5376:INFO:[\\.\Tape1]: Processed [1073840368] bytes. Throughput [44,744,704] B/s. Continuing...:

<DATE> 10:27:27 2013:5376:INFO:[\\.\Tape1]: Processed [1342308592] bytes. Throughput [53,693,644] B/s. Continuing...:

<DATE> 10:27:33 2013:5376:INFO:[\\.\Tape1]: Processed [1610776816] bytes. Throughput [44,744,704] B/s. Continuing...:
Depending on the hardware performance/throughput, this scan can take a long time to complete.
When the tape device supports FSR, you can workaround the problem as described in the Resolution.
Resolution
Note: Manual editing of the job definition is not recommended. If you have any questions, call Catalogic Software Data Protection Technical Support.
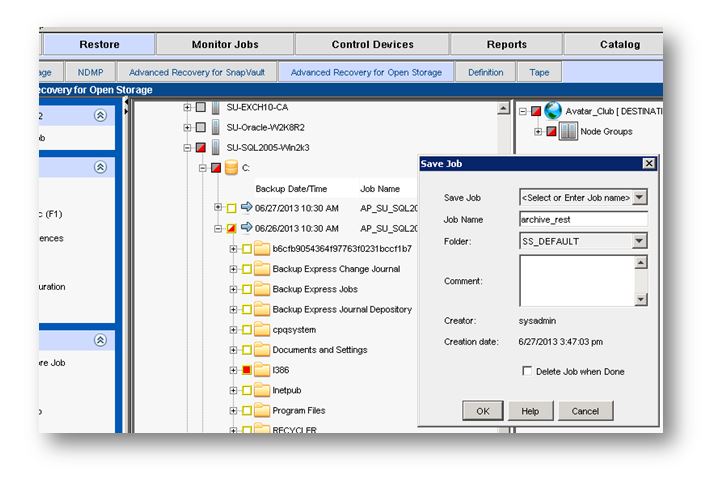
1. Select the files/folders to restore and save the job:
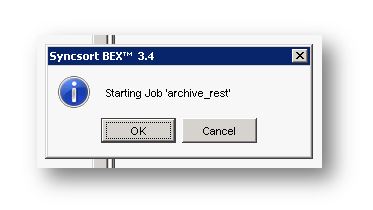
2. Start the restore job:
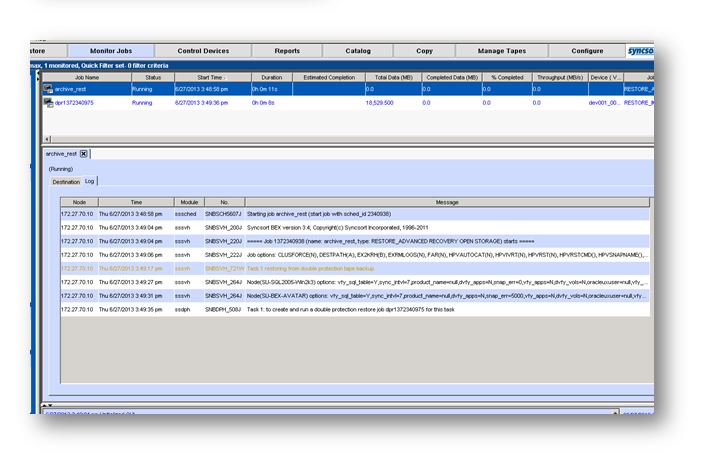
3. The restore job displays a DPR# (double protection restore) job. It is created to get the files from tape:
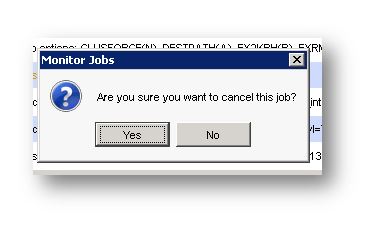
4. Now cancel the DPR# restore job from the job monitor:

5. Confirm that you want to cancel the job:
6. On the master server, open the folder where BEX/DPX is installed and browse to <PATH>/BEX/db/JOB/:
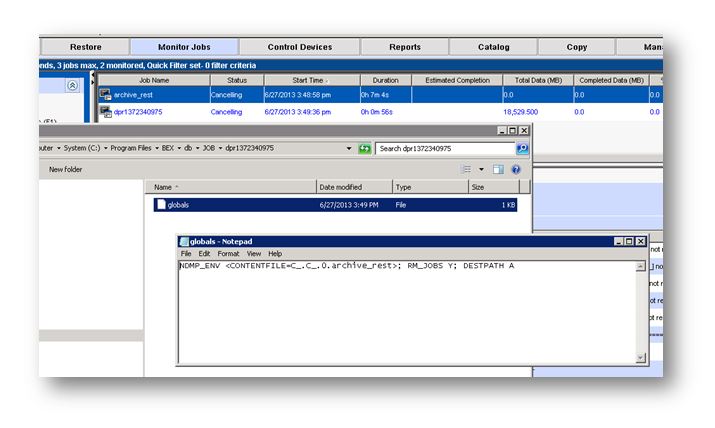
Open the DPR# job that you just canceled and add NDMP_RECV D; to the end of the line.
The content of the file looks similar to:
NDMP_ENV <CONTENTFILE=C_.C_.0.archive_rest>; RM_JOBS Y; DESTPATH A; NDMP_RECV D;
Save the DPR# file
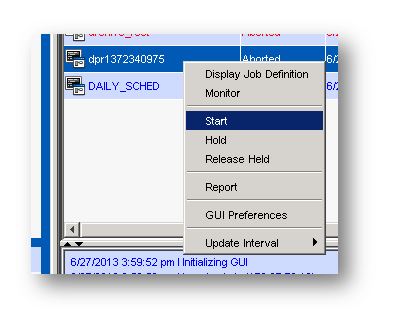
7. From the job monitor, start the DPR# job that was canceled earlier:
8. Confirm in the job monitor that the NDMP_RECV D; option displays in the job report:
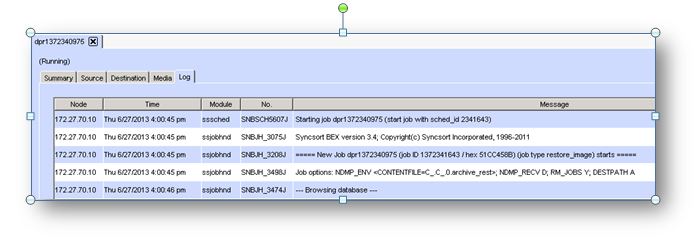
Confirm in the nibbler.log on the device server that FSR is used. Example:
<DATE> 16:02:26  2013:4856:INFO:tapectl:[fsr:182]

<DATE> 16:02:26  2013:4856:INFO:bextapedevice::fsr(182) step (182)...

<DATE> 16:02:26  2013:4856:INFO:[\\.\Tape1]:after fsr(182): Tape position: block:[816] partition:[0]
Screen illustrations that appear in this guide may not match those found in your product implementation, due to variations in customization.